
Overview over the project
After we, that is Andreas Stallinger and me, experimented a little bit with the Arduino Duo during our class “Interface Technologies” we found the Arduino Lilypad among some hardware supplied to us. First we didn’t know what it was but after a little research we found out it’s designed to be used on clothing. The Lilypad is a tool to create wearable technologies. That cought our attention and we were excited to have this tool at our disposal. So we thought about what we could create with the Lilypad. We wanted to make something useful which wasn’t complicated the handle and could be used in everyday life. So we came up with the idea to create a watch which was sewed into a shirt. Due to the lack of a display which is comfortable to watch we used LEDs to create a binary watch.
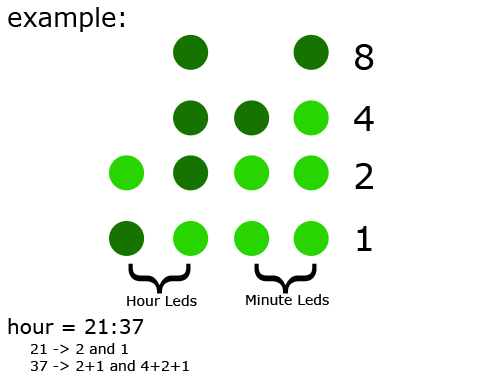
The watch has two Buttons which increase the minutes or hour count by one every time you press it. All in all we have 14 LEDs in use. 1 LED which blinks every second. The minutes and hours are displayed like in this picture:
Planing
We started by doing some research about the arduino Lilypad and how it’s different from the arduino duo. We realised there are only small differences.
Then we came up with a basic design for the watch. After that we had a idea about what parts we were going to need and found out that all required parts were available and no extra parts needed to be ordered.
We drew a basic circuit layout of the watch we had planed so we wouldn’t get in trouble during sewing because of the tread crossing.
Implementation
For easier bug tracking and error handling we wanted to first connect all parts on a table without sewing it to some shirt. This proofed to be quite a challenge since there were many treads which had to be kept apart and connected to the Lilypad. We gave up this approach since it created too much effort for too little benefit.
So we sewed all the LEDs, the two buttons, the Lilypad and the battery module to a T-Shirt and connected the parts. The advantage of this was that all the treads were sewed into the shirt now and were more stable then when lying on a table.
Our binary watch logic is a simple determination process. We disassemble the current time in four different values: Two values for minutes, two for hours, and one four seconds. At first we thought we could only use 13 pins for the output. But the arduino can use every pin as output, if you declare a analog input as output in the setup function.
Experiences made
We learned quite a bit about handling a arduino. Also we improved our sewing skills quite a bit. I’ll now sew on that button in no time!
Our biggest problem however were our poor sewing skills. It took us quite a while to sew all the parts together. But besides that the parts weren’t sewed together very solid due to our lack of sewing technique. This creates loose connections from time to time which reset the watch or set it to a wrong time.
Also we had to find out that the AAA battery is to weak to handle this project. This might be the case because of the resistance of the tread or the power consumption of the LEDs.

